Testing atomic updates consist of two types of tests. First, you test that the update function calculates the correct values. Second, you test that the method called from multiple threads still leads to correct result.
To see how this works we look at an example containing two bugs.
The tested method should update the current value by the given update parameter multiplied by multiplyBy. And increment the updateCount when the value was updated.
public class TwoBugs {
 private final AtomicInteger value = new AtomicInteger(0);
 private int multiplyBy = 0;  // second bug: field must be volatile
 public void multiply(int update)  {
  value.updateAndGet( (v) -> {
	return v + update;		  // first bug: must be multiplyBy * update
  });
 }
 public void setMultiplyBy(int newMultiplyBy) {
  multiplyBy = newMultiplyBy;
 }
 public int getValue() {
  return value.get();
 }
}
The first bug, e.g, the incorrect calculation can be detected by the first test. And the second bug, the field must be volatile, can be detected by the second test.
To see that the logic of our class is correct we use single-threaded tests. Test here all input parameters, error handling and so on. Since our multiply method is easy we only use the following two tests:
@Test
public void testDefault() {
 TwoBugs withTwoBugs = new TwoBugs();
 withTwoBugs.multiply(5);
 assertEquals( 0 , withTwoBugs.getValue()  );
}
@Test
public void testUpdate() {
 TwoBugs withTwoBugs = new TwoBugs();
 withTwoBugs.setMultiplyBy(5);
 withTwoBugs.multiply(5);
 assertEquals( 25 , withTwoBugs.getValue()  );
 withTwoBugs.multiply(5);
 assertEquals( 50 , withTwoBugs.getValue()  );
}
We check in this test that the multiplication by the default value zero works, line 5. And that setting a new multipleBy work, line 12 and 14. Both tests fail, which we can easily correct by adding the multiplication by multipleBy in our method:
public class OneBug {
 public void multiply(int update)  {
   value.updateAndGet( (v) -> {
     return v + multiplyBy * update;
  });
 }
 // other fields and methods omitted
}
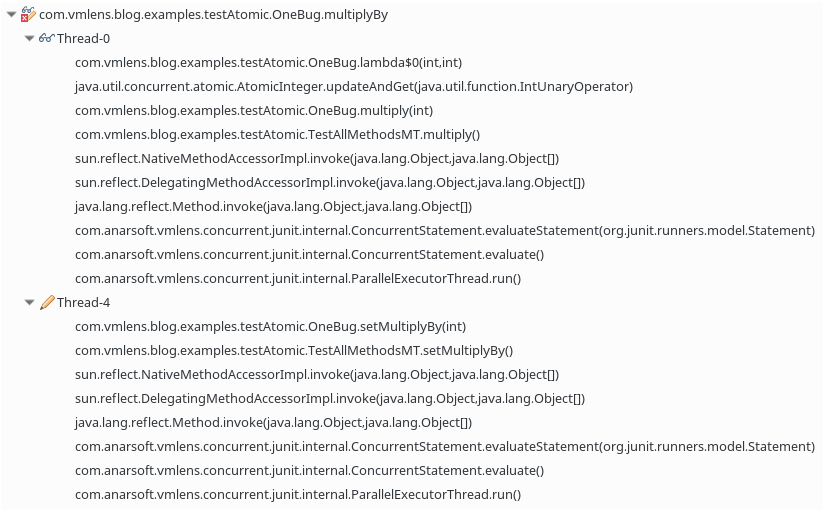
In the second test, we want to check that our methods are thread safe. To do this we call all methods in parallel by multiple threads:
@RunWith(ConcurrentTestRunner.class)
public class TestAllMethodsMT {
 OneBug withOneBug = new OneBug();
 @Test
 public void setMultiplyBy() {
  withOneBug.setMultiplyBy(5);
 }
 @Test
 public void multiply() {
  withOneBug.multiply(5);
 }
}
By using the RunWith annotation the JUnit test is run by a special ConcurrentTestRunner. This test runner runs the method annotated with "Test" parallel in 4 threads. Run the test with vmlens enabled to see the following race condition:
Here is the correct version of the class:
public class CorrectVersion {
 private final AtomicInteger value = new AtomicInteger(0);
 private volatile int multiplyBy = 0;
 public void multiply(int update)  {
  value.updateAndGet( (v) -> {
	return v + + multiplyBy * update;
  });
 }
 public void setMultiplyBy(int newMultiplyBy) {
  multiplyBy = newMultiplyBy;
 }
 public int getValue() {
  return value.get();
 }
}
When testing multi-threaded software you write two types of tests. First, write single threaded tests to test the functionality of your class. Here you should test all special cases. And after that use a multi-threaded test which calls all methods in parallel.